When you can’t teach in the studio right now, this could be the motivation you needed to start teaching yoga online
5 steps you need to take to make a bigger impact and support your students digitally by teaching yoga online.
1. Decide on your class format
Decide if you want to offer a class for more people, or private classes to just one person.
You can either teach a class that’s available to all your students and here the great news is that you actually have unlimited space, unlike in a small yoga studio, so you can get as many students to join your class as possible.
Or you can offer live online classes for your 1-on-1 students, where you teach just them. When they have a computer or phone with a camera you can see them, and you can chat face to face.
2. Decide if you want to get paid
You have three options here:
- Offer your class for free
the class for free is the easiest option because you don’t need to worry about getting paid and making sure that only paying students have access to your live class and all that. - Ask for a donation
This is also easy to set up. I recommend PayPal. for this. Go to PayPal. and set up an account and then you have a link that you can share with your students and they can enter whatever amount they choose. - Charge your students for the class
Is asking your students to pay for the class. If you want to use a free tool like Facebook Live, it’s a bit more tricky because you have to find a way to make sure that only students who paid find their way to your lifestream.
3. Decide on your streaming platform
 For a free live online class, you can use Facebook Live or YouTube Live. Facebook Live is free, it’s super easy to go live, and you can restrict access by going live in a private Facebook Group, so only members of that group will see your class. But your students need to be on Facebook and if a significant number of your students aren’t using Facebook, this might be a problem.
Another option is YouTube Live. To go live on YouTube you need to have a YouTube channel, and you need to activate your YouTube channel for going live, which can take up to 24 hours, so you need to do this in advance. You can restrict access by going live with an unlisted video and only people who have the link can watch.
4. Get your equipment
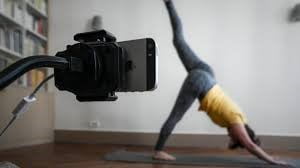
You need either a computer with a webcam, or you can use your iPhone or Android phone with a tripod.
Audio is also important because your students will listen more to your voice than watch you when they practice.
Using the internal microphone from your computer or phone isn’t going to cut it. It’s not loud enough, and when you move around it won’t be stable.
You either need to invest in a headset with a device that sends the audio to your computer or, and this is the easiest option and it’s amazing, use the Apple AirPods or any other brand of an in-ear headset.
5. Set up your filming location
 I recommend that you prepare your set-up – where to put the mat, your background, the camera, lighting, and sound, a day in advance. Clean up the clutter and remove any excess stuff that you might have in the background that looks messy.
Tape out a “safe area” perimeter for you to move around in without going out of frame – if you’re doing a yoga video, you want to make sure you position the camera so you’re able to capture your entire body.
Natural light is best but take care that you don’t have a big window behind you and no other lights, because then you will be really dark. It’s best if the window is behind the camera, or on the side, and you can also invest in a ring light.
CLICK HERE For More Course Inclusions and Our June Main Event![]()


